Just completed another Superhero from Reaper. This one is called Twister and is clearly an air elemental hero, a companion for Inferno that I already painted. There are an earth and water figure, too, but I haven't got my hands on them yet. Both the blue and white were just a base colour highlighted up by adding white. In the case of the white/grey it was VMC Light Grey with white added until it was just white. The blue was VMC Andrea Blue with white added and a final highlight of VMC Sky Blue. I thought the base needed a bit of dressing so I added some newspaper pages swirling in the gusts. It's not brilliant but it'll do! I wasn't sure of the brown hair either will the whole thing was finished, but now I think it looks just right.
About Me
- Black Smoke
- I'm a bit of a born-again wargamer! I played many of the Games Workshop games when I was in my teens and early twenties, but left the hobby behind when I went to University. Over the last few years I have gradually got back into it and am literally having a ball! I'll play pretty much anything now, ranging from ancient historical to the far future! I think that I get more out of the painting side of things than actually playing, but that might just be because I get more opportunity. Hence the title...this blog is all about the colour of war!!
Tuesday, 17 April 2012
Wednesday, 11 April 2012
Malifaux - first impressions
She's a honey, isn't she? :)
Played my first game of Malifaux last night at the G3 club in Glasgow and thought I'd post my impressions. Normally I would try and review the game, but there are so many good reviews out there that I don't think I could really add anything new, so I've just provided a couple of links at the end of this post. So this is really just a reflection of the experience and my thoughts on what I liked and didn't like. Alas, I got a little swept up in the game and forgot to take pictures! Next time...!
I've been aware of (and collecting the books and figures for) Malifaux for quite some time now. I think it must be more than a year and you can chart the incredibly slow pace of my painting over the course of this blog, but I had never had the pleasure of playing it, mostly for want of opposition. So I was pleased to find that the G3 has an active Malifaux contingent and immediately set about trying to get a game. A really nice bloke called George graciously agreed to guide me through the mechanics and off we went! We eschewed schemes as it was my first game and just took a strategy each. I used my Guild Ortega crew and drew the 'Slaughter' strategy, which really plays into their strengths. George took Rasputina with some hulking monstrosity called Snow Storm! If they intended to intimidate you with that figure, then Wyrd succeeded! Anyway, he drew 'Reconnoiter' which was possibly the poorest strategy he could have got, given the slow movement rate of most of his figures.
The game basically played out with the Arcanists grouping up to take advantage of the many mutually supporting abilities and advancing up the middle of the table. The Guild spread out and just blasted away with everything they have and started to whittle away the minor characters like the Gamins. There were three critical moments that had a major impact on the outcome:
First, after Nino had landed a couple of weak shots on Rasputina, Perdita managed to hit her with a Peacebringer strike after using a Soulstone to make sure of the hit. The damage was only moderate, so I played the Red Joker from my hand (i.e. her above) and that automatically caused severe damage which killed her outright!
Second, the huge Snow Storm character landed a series of devastating ice blasts on Papa Loco, which also caught Francisco and Perdita. Francisco was killed and Papa Loco reduced to a single wound. Critically, I managed to cheat fate on the last casting attempt and caused the spell to fail, as Papa Loco would have gone up in smoke and likely taken Perdita with him!
Lastly, Papa Loco made his last move which was to run into range of the Arcanist group and use his 'Take Ya With Me' spell! This essentially meant the detonation of a large amount of TNT that killed Gamin after Gamin. Unfortunately for the Arcanists they each shattered into fragments that damaged Snow Storm enough for the surviving Guild to gang up and take him down. Great fun!
What I liked
This was a really entertaining game! There was quite a few 'cinematic' moments with characters getting frozen to terrain (as George pointed out, they shouldn't have licked the drainpipes!) and huge explosions. So my first impression is that Malifaux is FUN! And this is what skirmish gaming is all about! Both of us were in the mind to enjoy the game and I was buzzing for a while afterwards and wanted to play again, there and then. If that's the mark of a good game then Malifaux has it in spades!
I also really, really like the card mechanism. This is central to the game and the use of the suits to control triggers and spells is simply genius! It's very refreshing, too; a game that you can play entirely without the use of a single die. The control cards that you have in your hand also play a major part and that just adds another dimension to the game. Let's face it, decisions are the mainstay of any wargame. That's why we play them and the more impact they have on the game, the better. In Malifaux you are deciding what figure to activate next, what abilities will it use, how can they influence the current and future situation, whether to expend precious soulstones and whether to cheat fate (by playing a card out of your hand instead of the one drawn). A myriad of decisions need to be made constantly and I found that barely a minute elapsed where I wasn't thinking about my next move or agonising over whether to accept a hit and keep the good control cards for later or not.
Finally, the characters themselves. They are all highly individual and each brings value to the table. Even from very limited exposure to the game it can be seen that there are many synergies between characters, but I suspect that there is real depth here and you could find some pretty odd, but powerful combos with some experimentation. And that brings replayability!
What I didn't like
Nothing!
Seriously! I liked it all! OK, I probably didn't like having to refer to the cards all the time, but that's more a feature of my noobness. The more you play with the same crew, the more you'll get to know their abilities without constant reference. Although, having said that, the vets at the club acknowledged that even with experience you still need to reference the cards as there is so much to it. And that's actually a good thing in my book!
The verdict...?!
You should have guessed this by now! I love the game and I want to play it again as soon as possible. From the moment I bought the rules and read them I knew I would like it and last night just affirmed that. So now I have an unbridled desire to paint all the Wyrd stuff I have, but I must reel it in! I will finish the second Guild Guard figure and then finish the Super team I have assembled. Then, and only then, will I allow myself to paint more Malifaux. Until then, I'll just get to know Perdita a little better...if she'll let me! :)
Reviews:
Anatoli's Game Room Review
Bell of Lost Souls Review
BoardGameGeek Review
Friday, 6 April 2012
Malifaux Guild Guard 1
Just finished the first of the Guild Guard figures I've been working on. As they're Guild I thought I'd better do them a bit better than normal to fit in with the rest of Perdita's crew. The coat on this one was painted Vallejo Dark Blue and then shaded by adding Dark Prussia Blue to it bit by bit and glazing away. Then Andrea Blue was added to the Dark Blue and some very minimal highlights added. To try something different I painted the second Guardsman coat by starting with Dark Prussia Blue and highlighting up. To be honest I prefer this model, but I won't go back and repaint the other one. Hopefully I'll get it finished before next Tuesday, though, because...shock...I actually have my very first game of Malifaux scheduled! Really looking forward to that and I'll try to remember to take some pics and post a batrep. After that I'll be concentrating on more Reaper superheroes.
Again, not varnished yet so excuse some shininess in a couple of pictures. I'm hoping to pop into town tomorrow to investigate some alternatives.
Thursday, 5 April 2012
Up and at them!
Rainer Wolfcastle: Up and at them.
Dialogue coach: No, "Up and atom".
Rainer Wolfcastle: Up and at them.
Dialogue coach: Up and *atom*.
Rainer Wolfcastle: Up and at them.
Dialogue coach: [frustrated] Better.
A couple of weeks ago a colleague at work introduced me to SuperSystem. I'd never heard of it before and the idea of creating your own superheroes? Well...who could resist? A good deal of my University grant and loan money was spent on comics and I've always liked the genre. So I had to get some figures for it. I looked at Superfigs first, but it seems you can only source them from the US, so I thought there must be more lines out there somewhere. Enter trusty old Reaper miniatures! The Chronoscope line has several suitable figures, all bearing that mark of quality sculpting. So first up is Inferno, the female version of the Human Torch:
I haven't varnished her yet, as I'm actually in the market for a new varnish, not being satisfied with recent attempts using brush on and spray Humbrol Matt Cote. So the pictures aren't the best, but they'll have to do. Not entirely convinced about the fire, but I think it's as good as I can get on a first attempt. Still toying with adding an icon to her suit, too, but I can't decide what!! Perhaps when the team is done I'll think up one for them all, like the X-Men, or something.
Friday, 16 March 2012
Malifaux Flesh Construct
This must be some sort of record for me! 3 posts in as many days! Anyway, I finished my first Resurrectionist figure for Malifaux and thought I'd post it, particularly as I'd like feedback on the flesh. I followed the recipe on Anatoli's Game Room (link) for recently deceased zombies, but I don't have Tanned, Dwarf or Elf Flesh paints. So instead I used Cork Brown, 50/50 Cork Brown and Flat Flesh and Flat Flesh from Vallejo. Being very, very colourblind I have no idea if it actually worked! So, if any of you kind readers would like to comment on whether this looks any good or not, I'd appreciate it!
Here he is! I've decided to forego the effort and standard of painting that I put into the Guild simply because I don't have the time and I just want to get the Ressers done so I can play the damned game! :) I'll probably paint the Guild Guard I have a bit better, just for consistency, but these guys just need to get some paint on!
Thursday, 15 March 2012
Force on Force - actions and reactions
As we will see, not every action has an equal and opposite reaction in Force on Force!
In my last blog entry I talked about Force on Force and provided a review in the context of an AAR. However, I glossed over one of the most important features of the ruleset...reactions! So I thought I would write a follow-up that looks at this critical aspect in more detail, as it is what really makes the game great!
I think that the AAR/review format worked quite well, so I'll use pictures of figures to illustrate the action/reaction, although it will be a fabricated situation and not an actual 'in play' AAR. I don't actually have any modern stuff painted up yet (that last game was using all George's stuff), so I will use my 28mm WWII Tommies and Fallschirmjager. But first, let's recap the reaction test.
Whenever an initiative unit (IU) announces that it will take an action, any non-initiative unit (NIU) that has LOS to it may announce a reaction. Note that this is optional, as performing a reaction uses up any subsequent action the NIU may make. In most cases, though, you're going to want to react. If the NIU declares a reaction it may be one of two options - move or fire. However, a reaction test must be made to see who gets to perform first. Both sides roll a TQ dice and the side that passes (4 or more on the TQ die) gets to perform it's intended (re)action first. In the case that both die rolls succeed, the highest roll wins. In the case of draws, or both die failing, then the IU goes first. Let's look at an example:
The above illustrates a successful reaction test. If the Tommies failed the reaction test they would have to endure the fire before moving, so you better hope you win that dice roll!
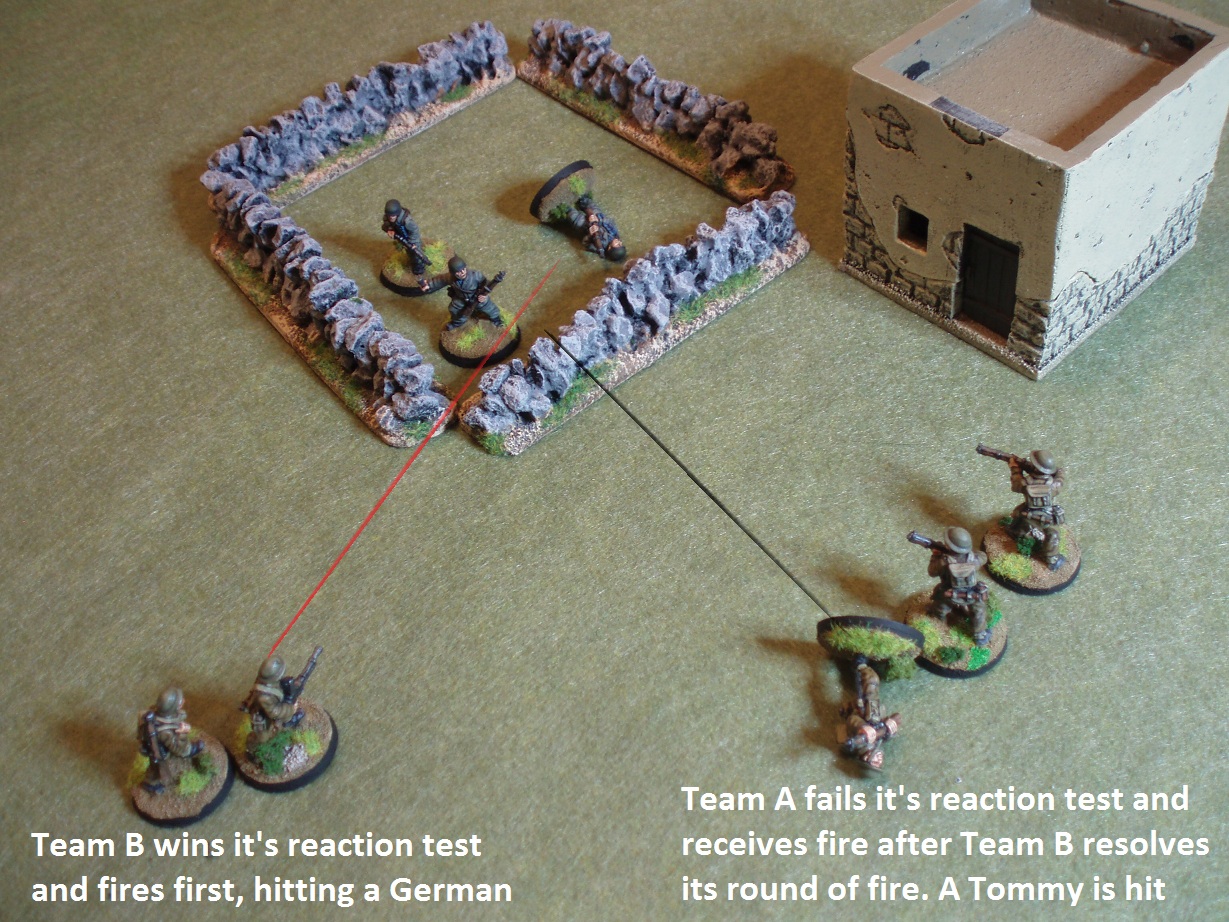
So, that's pretty simple, eh? Well, remember that the reaction can be to fire at the IU instead. Any NIU in LOS can engage the IU in a round of fire as a reaction. The IU may decide to return fire. Every time a unit fires it loses 1 FP die for further actions or reactions that turn so sometimes you may want to take the hit and save the FP. Perhaps an example might help again:
EDIT - after browsing the rules, I realised I got the order of the above reactions the wrong way round. Team A that fails it's reaction should receive fire and move before Team B shoots. When there are multiple reactions you roll for all reaction tests first and then resolve all the NIUs that failed their test first. I've left the text in place for now, but I will reshoot the above sequence and replace as soon as I can.
Hmmm...! Still pretty simple if you ask me! To wind up, we'll look at the two features of modern rulesets that are notoriously hard to deal with - overwatch and opportunity fire. Opportunity fire is pretty simple; any IU that hasn't acted yet may sacrifice it's action to react to an enemy movement. So if the NIU successfully reacts with movement, then a second fire team may take an opportunity shot at them. Overwatch is slightly different. You place an IU on overwatch at the beginning of the turn and for the duration they may interrupt a reaction with fire. So an IU announces its action, a NIU announces it's reaction and then the overwatch unit announces it's interruption. The overwatch round of fire is treated normally and then the NIU may roll it's reaction test, if it can (i.e. it's not pinned or suppressed). One more example, methinks:
See? It's all pretty straightforward when you work it all out methodically. Of course, there are a lot of variations on the above situations with morale and suppression fire taking a big part. There are also situations where units can fall off overwathch. The examples I've given are the basics and there are even more differences when you deal with asymmetric warfare, as irregulars are limited in their reactions. The rules are very rich in content and deal with all sorts of stuff, so you'll just have to buy them to find it all out!
Again, I can't recommend Force on Force highly enough! The action/reaction mechanism coupled with the fantastic dice mechanism, results in a very fluid game that can be completed quickly and gives a believable result.
In my last blog entry I talked about Force on Force and provided a review in the context of an AAR. However, I glossed over one of the most important features of the ruleset...reactions! So I thought I would write a follow-up that looks at this critical aspect in more detail, as it is what really makes the game great!
I think that the AAR/review format worked quite well, so I'll use pictures of figures to illustrate the action/reaction, although it will be a fabricated situation and not an actual 'in play' AAR. I don't actually have any modern stuff painted up yet (that last game was using all George's stuff), so I will use my 28mm WWII Tommies and Fallschirmjager. But first, let's recap the reaction test.
Whenever an initiative unit (IU) announces that it will take an action, any non-initiative unit (NIU) that has LOS to it may announce a reaction. Note that this is optional, as performing a reaction uses up any subsequent action the NIU may make. In most cases, though, you're going to want to react. If the NIU declares a reaction it may be one of two options - move or fire. However, a reaction test must be made to see who gets to perform first. Both sides roll a TQ dice and the side that passes (4 or more on the TQ die) gets to perform it's intended (re)action first. In the case that both die rolls succeed, the highest roll wins. In the case of draws, or both die failing, then the IU goes first. Let's look at an example:
| The Germans are the IU and announce they will fire at the British. The British announce they want to move in reaction. |
| The British win the reaction test and move first. |
So, that's pretty simple, eh? Well, remember that the reaction can be to fire at the IU instead. Any NIU in LOS can engage the IU in a round of fire as a reaction. The IU may decide to return fire. Every time a unit fires it loses 1 FP die for further actions or reactions that turn so sometimes you may want to take the hit and save the FP. Perhaps an example might help again:
| Same as above, but now we have a second British team with a Bren (which we'll count as a SAW). |
| The Bren team hoses the Germans before they can shoot the other team, but a British trooper is still hit. |
| The British may now complete their move, but they have lost a man. |
Hmmm...! Still pretty simple if you ask me! To wind up, we'll look at the two features of modern rulesets that are notoriously hard to deal with - overwatch and opportunity fire. Opportunity fire is pretty simple; any IU that hasn't acted yet may sacrifice it's action to react to an enemy movement. So if the NIU successfully reacts with movement, then a second fire team may take an opportunity shot at them. Overwatch is slightly different. You place an IU on overwatch at the beginning of the turn and for the duration they may interrupt a reaction with fire. So an IU announces its action, a NIU announces it's reaction and then the overwatch unit announces it's interruption. The overwatch round of fire is treated normally and then the NIU may roll it's reaction test, if it can (i.e. it's not pinned or suppressed). One more example, methinks:
See? It's all pretty straightforward when you work it all out methodically. Of course, there are a lot of variations on the above situations with morale and suppression fire taking a big part. There are also situations where units can fall off overwathch. The examples I've given are the basics and there are even more differences when you deal with asymmetric warfare, as irregulars are limited in their reactions. The rules are very rich in content and deal with all sorts of stuff, so you'll just have to buy them to find it all out!
Again, I can't recommend Force on Force highly enough! The action/reaction mechanism coupled with the fantastic dice mechanism, results in a very fluid game that can be completed quickly and gives a believable result.
Fourth on Force
Tonight George and I played our fourth game of Force on Force and it was easily the best yet. Mostly because we now have a much firmer grasp on the rules. There was still a couple of occasions of flipping through the rules, but they were few and didn't disrupt the flow of the game too much. Instead, we got down to the serious business of rescuing a downed pilot from underneath the noses of the Taliban! Now, rather than just write an AAR, I thought I'd make this into a kind of review of the rules, too.
The Rule Book
Force on Force is published by Osprey in collaboration with Ambush Alley Games who designed the rules. I believe there were actually two volumes formerly produced by AAG and this version is actually the combination of them both. Unsurprisingly, the quality of the book is excellent with lovely plates of modern soldiers in full colour as well as photos of actual men in combat situations, which really beds you into the atmosphere and theme of the game. There is are also a few photos of miniatures to remind you that this is a wargames rule set! There are the usual chapters on movement and shooting, but there are also chapters on armoured combat, air support and artillery. Possibly of most interest, though, is the section on asymmetric warfare. So this is regular troops against irregular forces, such as the Taliban or Iraqi forces in the later stages of the second Gulf War. There is also a campaign section to take these rules a step further.
There is one criticism that I will lay at the feet of the publishers, which is it's poor layout. Some important rules are laid out in later sections after they have been mentioned, such as the action/reaction sequence. When you're reading through the rules it all makes perfect sense, but it can be quite frustrating trying to find something during play. Once you have the rules in your head, though, this is less of an issue and there is ample support in the form of the AAG forums. On the whole, this is really nice book and an attractive addition to any wargamer's bookshelf.
The Game
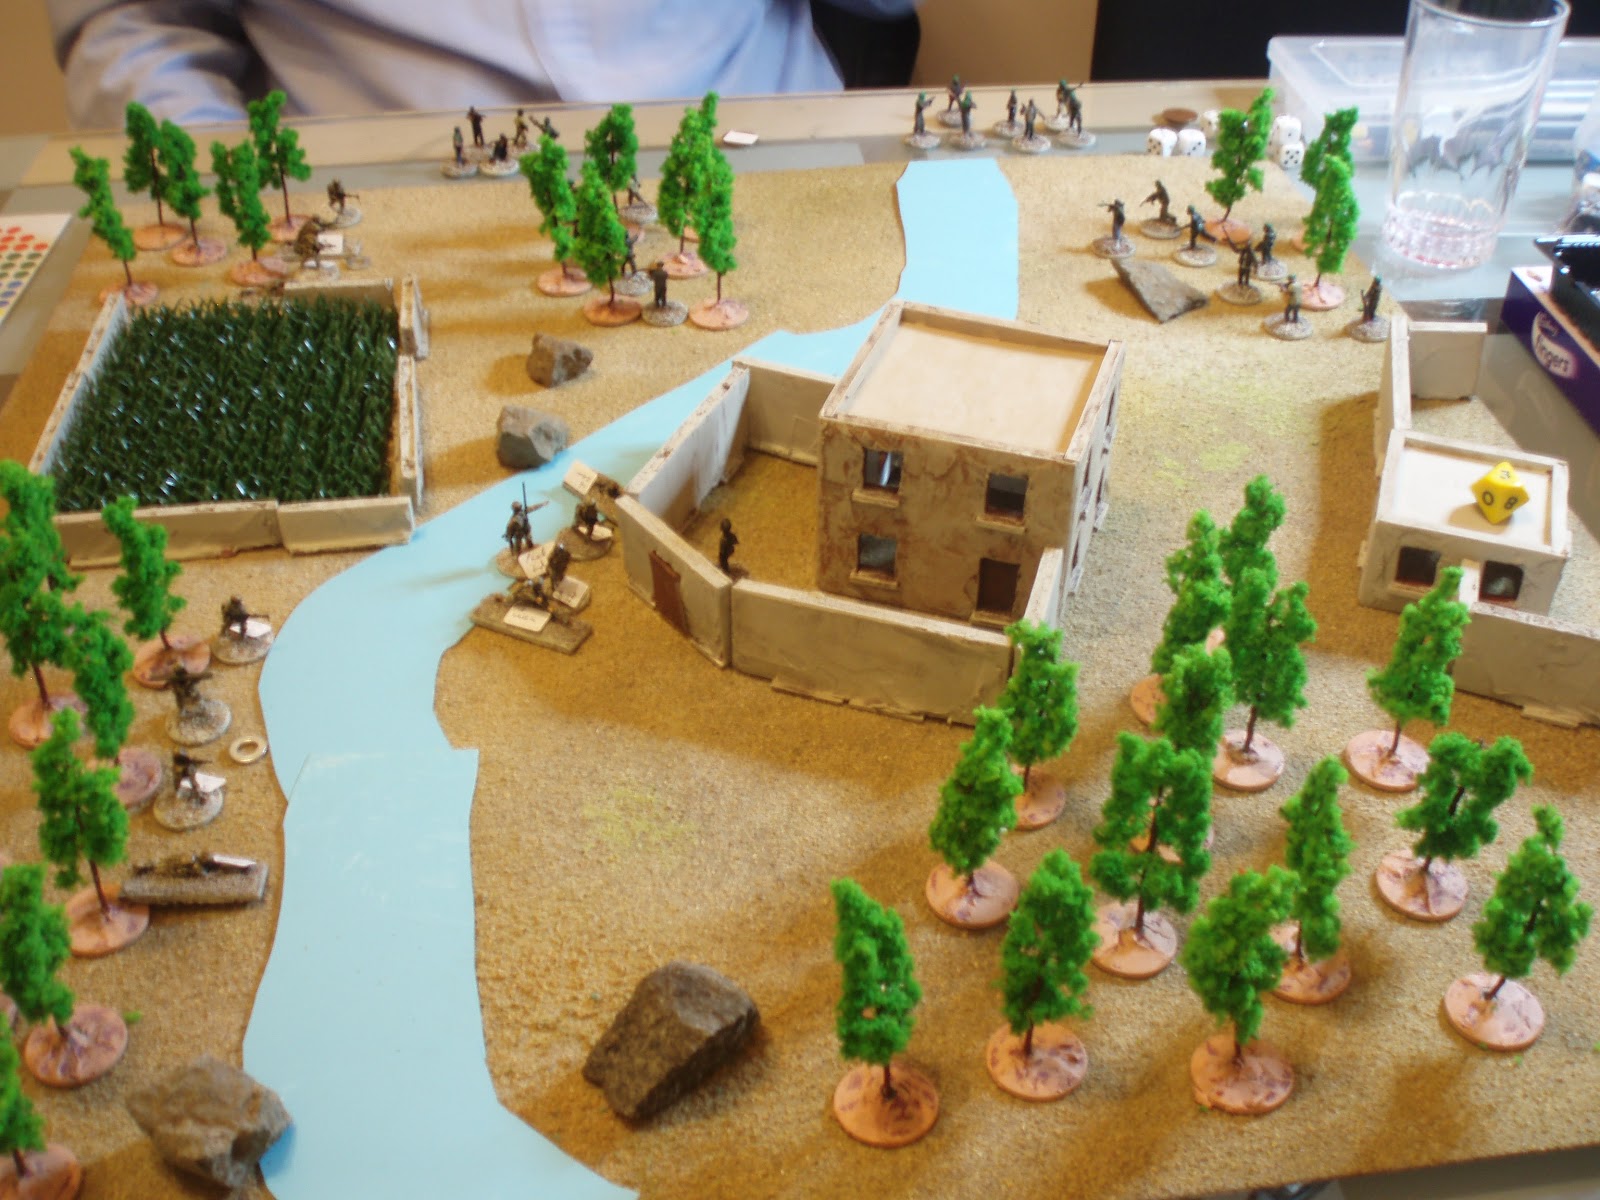
Now it's time to examine the rules in the context of our game. The situation is a downed pilot is hiding in the grounds of a house in Taliban territory and a British section has been dispatched to retrieve him. There is definitely enemy activity in the area so the Brits must be careful. Here's the setup - the Taliban forces are all hiding and so are not deployed on the table:
The player to move first in each turn is normally decided by a dice roll. Each player rolls a dice for every two of his units, plus a couple of modifiers, and the one with most successes (more about that later) wins the initiative. They then move each unit in turn with the opponent having the option to react to those actions. However, as the British are moving into the teeth of an ambush, the Taliban had the initiative by default on the first turn. They opted to stay hidden, though, leaving the British to start moving in. The second turn saw the Taliban again take the initiative and they decided to spring the first ambush on the British left...!
The Dice Mechanism
Each side is rated for it's initiative, quality and morale. The ratings are expressed in terms of a type of dice. Poor quality militia will have a Troop Quality (TQ) and Initiative of D6, while regulars are usually D8. In FoF there is a 'nearly universal' rule that whenever you roll a die, a result of 4 or more is a success. Let's examine that, as it's key to the game mechanics. You are always looking for a 4 or more, so the higher the quality of your men, the more likely you are to roll a success. So, in that second turn, how did the Taliban gain the initiative? They had four units, generating them 2 dice. They also had the initiative last turn which added another die. They also added another die for outnumbering the enemy. So they had 4. The British had 3 units, so they only got one die. So the Taliban rolled their 4D6 against the British 1D8. They rolled more successes than the British so retained the initiative.
The Trap is Sprung - How to React!
So, using the initiative, the Taliban deployed their first unit from hiding. They had to roll a single TQ die to see if they were successful and they were, so they fired first. Normally in FoF, whenever the side with initiative activates a unit, the other side can declare reactions by any unit with LOS to the acting unit. However, each unit then rolls an opposed TQ check, called a Reaction Test. Each side rolls 1 TQ die and the side that rolls a success wins. If both succeed, the highest roll wins. If both fail, the side with initiative wins. Aha! So here we have the integral dice mechanism again. If you're rolling a D8 against a D6 opponent, then you can win hands down with a roll of 7 or 8! Alas, due to scenario rules regarding ambushes, the Taliban got to fire first regardless.
Shoot Straight!
Each figure in the firing unit generates a Firepower (FP) die which are of the TQ type (i.e. TQ of D6 means your FP are also D6). Support weapons like SAWs and RPGs add extra FP. The defending unit then counts up the number of figures in the target unit and compares to the number of FP dice. He then takes the number of TQ dice equal to the lower of the two numbers. So, for example, in our ambush, the Taliban have six figures firing. One carries an RPG, so they have 7 D6. The British fireteam is only four strong, so they get 4D8. They have body armour and are in cover, so they get two extra dice for 6 total. They are rolled simultaneously :
Any failed rolls (3 or less) don't count. Then, the defender tries to negate any FP dice with defence dice of equal or higher value. So here's a picture of a British attack roll that happened later in the game with all the failures removed and the remaining D6 defence dice canceling out those D8s that they can:
Here we see it again! The British rolled two 7s and an 8. The Taliban player is simply powerless to cancel those dice and the British are assured of 3 hits. Pretty easy and very intuitive! In this way, the better training and equipment of the regular forces really pays dividends! In our ambush situation, despite firing 7 dice, they managed to inflict no casualties.
The Story Unfolds!
We've had a brief look at the nuts and bolts of the game, so let's see how the battle unfolded. The British, having survived the first shots, now managed to seize the initiative (which they would hold for the rest of the game bar one turn). The flank fireteams fell into overwatch while the central fireteam crossed the stream heading for the objective.
The Taliban revealed a second unit on the British right, but using fire and maneouver the British forces pinned them and advanced the right flank to screen the central troops grabbing the pilot.
More enemy troops poured in through the woods and the British right soon found themselves under a lot of pressure. One soldier was hit, but luckily he was only lightly wounded and could carry on fighting. Their work was of great value, though, as the section leader signalled to the pilot to follow and they set off for the safety of their own lines.
Meanwhile, on the left a sharp exchange of fire saw the Taliban threat neutralised and the British surged in to capture the remnants.
As the Taliban casualties mounted through accurate fire from the British they were powerless to act as the pilot was safely escorted across the stream and into the safety of the woods beyond.
This was a very enjoyable game. The high quality of the British really turned the battle and on at least two occasions the Taliban rolled some very good dice, only to be thwarted by numerous 7s and 8s from the British. Force on Force is simply a very, very good game. The games are all scenario based and provide a strong narrative and very believable results. I really have only skimmed over the core of the rules, in particular the action/reaction sequence that has some very subtle nuances that are most satisfactory. If your interest has been piqued then I guess you'll have to buy the rules! I highly recommend anyone interested in skirmish games or modern warfare do so!
The Rule Book
Force on Force is published by Osprey in collaboration with Ambush Alley Games who designed the rules. I believe there were actually two volumes formerly produced by AAG and this version is actually the combination of them both. Unsurprisingly, the quality of the book is excellent with lovely plates of modern soldiers in full colour as well as photos of actual men in combat situations, which really beds you into the atmosphere and theme of the game. There is are also a few photos of miniatures to remind you that this is a wargames rule set! There are the usual chapters on movement and shooting, but there are also chapters on armoured combat, air support and artillery. Possibly of most interest, though, is the section on asymmetric warfare. So this is regular troops against irregular forces, such as the Taliban or Iraqi forces in the later stages of the second Gulf War. There is also a campaign section to take these rules a step further.
There is one criticism that I will lay at the feet of the publishers, which is it's poor layout. Some important rules are laid out in later sections after they have been mentioned, such as the action/reaction sequence. When you're reading through the rules it all makes perfect sense, but it can be quite frustrating trying to find something during play. Once you have the rules in your head, though, this is less of an issue and there is ample support in the form of the AAG forums. On the whole, this is really nice book and an attractive addition to any wargamer's bookshelf.
The Game
Now it's time to examine the rules in the context of our game. The situation is a downed pilot is hiding in the grounds of a house in Taliban territory and a British section has been dispatched to retrieve him. There is definitely enemy activity in the area so the Brits must be careful. Here's the setup - the Taliban forces are all hiding and so are not deployed on the table:
| The battlefield. Perhaps taken by a UAV! |
| The scene from behind Fireteam Charlie looking towards the objective. |
The Dice Mechanism
Each side is rated for it's initiative, quality and morale. The ratings are expressed in terms of a type of dice. Poor quality militia will have a Troop Quality (TQ) and Initiative of D6, while regulars are usually D8. In FoF there is a 'nearly universal' rule that whenever you roll a die, a result of 4 or more is a success. Let's examine that, as it's key to the game mechanics. You are always looking for a 4 or more, so the higher the quality of your men, the more likely you are to roll a success. So, in that second turn, how did the Taliban gain the initiative? They had four units, generating them 2 dice. They also had the initiative last turn which added another die. They also added another die for outnumbering the enemy. So they had 4. The British had 3 units, so they only got one die. So the Taliban rolled their 4D6 against the British 1D8. They rolled more successes than the British so retained the initiative.
The Trap is Sprung - How to React!
| The Taliban appear out of nowhere in the treeline! |
Shoot Straight!
Each figure in the firing unit generates a Firepower (FP) die which are of the TQ type (i.e. TQ of D6 means your FP are also D6). Support weapons like SAWs and RPGs add extra FP. The defending unit then counts up the number of figures in the target unit and compares to the number of FP dice. He then takes the number of TQ dice equal to the lower of the two numbers. So, for example, in our ambush, the Taliban have six figures firing. One carries an RPG, so they have 7 D6. The British fireteam is only four strong, so they get 4D8. They have body armour and are in cover, so they get two extra dice for 6 total. They are rolled simultaneously :
Any failed rolls (3 or less) don't count. Then, the defender tries to negate any FP dice with defence dice of equal or higher value. So here's a picture of a British attack roll that happened later in the game with all the failures removed and the remaining D6 defence dice canceling out those D8s that they can:
| Here comes the pain! |
The Story Unfolds!
We've had a brief look at the nuts and bolts of the game, so let's see how the battle unfolded. The British, having survived the first shots, now managed to seize the initiative (which they would hold for the rest of the game bar one turn). The flank fireteams fell into overwatch while the central fireteam crossed the stream heading for the objective.
The Taliban revealed a second unit on the British right, but using fire and maneouver the British forces pinned them and advanced the right flank to screen the central troops grabbing the pilot.
By now, more Taliban were coming out of the woodwork and a group made a beeline for the pilot's hidey hole to try and prevent his escape. However, the vigilant British on the right were alert to the danger and poured fire on them in reaction to their appearance.
More enemy troops poured in through the woods and the British right soon found themselves under a lot of pressure. One soldier was hit, but luckily he was only lightly wounded and could carry on fighting. Their work was of great value, though, as the section leader signalled to the pilot to follow and they set off for the safety of their own lines.
Meanwhile, on the left a sharp exchange of fire saw the Taliban threat neutralised and the British surged in to capture the remnants.
As the Taliban casualties mounted through accurate fire from the British they were powerless to act as the pilot was safely escorted across the stream and into the safety of the woods beyond.
This was a very enjoyable game. The high quality of the British really turned the battle and on at least two occasions the Taliban rolled some very good dice, only to be thwarted by numerous 7s and 8s from the British. Force on Force is simply a very, very good game. The games are all scenario based and provide a strong narrative and very believable results. I really have only skimmed over the core of the rules, in particular the action/reaction sequence that has some very subtle nuances that are most satisfactory. If your interest has been piqued then I guess you'll have to buy the rules! I highly recommend anyone interested in skirmish games or modern warfare do so!
Subscribe to:
Posts (Atom)