About Me

My photo
I'm a bit of a born-again wargamer! I played many of the Games Workshop games when I was in my teens and early twenties, but left the hobby behind when I went to University. Over the last few years I have gradually got back into it and am literally having a ball! I'll play pretty much anything now, ranging from ancient historical to the far future! I think that I get more out of the painting side of things than actually playing, but that might just be because I get more opportunity. Hence the title...this blog is all about the colour of war!!

Friday, 16 March 2012

Malifaux Flesh Construct

This must be some sort of record for me! 3 posts in as many days! Anyway, I finished my first Resurrectionist figure for Malifaux and thought I'd post it, particularly as I'd like feedback on the flesh. I followed the recipe on Anatoli's Game Room (link) for recently deceased zombies, but I don't have Tanned, Dwarf or Elf Flesh paints. So instead I used Cork Brown, 50/50 Cork Brown and Flat Flesh and Flat Flesh from Vallejo. Being very, very colourblind I have no idea if it actually worked! So, if any of you kind readers would like to comment on whether this looks any good or not, I'd appreciate it!

Here he is! I've decided to forego the effort and standard of painting that I put into the Guild simply because I don't have the time and I just want to get the Ressers done so I can play the damned game! :) I'll probably paint the Guild Guard I have a bit better, just for consistency, but these guys just need to get some paint on!


Thursday, 15 March 2012

Force on Force - actions and reactions

As we will see, not every action has an equal and opposite reaction in Force on Force!

In my last blog entry I talked about Force on Force and provided a review in the context of an AAR. However, I glossed over one of the most important features of the ruleset...reactions! So I thought I would write a follow-up that looks at this critical aspect in more detail, as it is what really makes the game great!

I think that the AAR/review format worked quite well, so I'll use pictures of figures to illustrate the action/reaction, although it will be a fabricated situation and not an actual 'in play' AAR. I don't actually have any modern stuff painted up yet (that last game was using all George's stuff), so I will use my 28mm WWII Tommies and Fallschirmjager. But first, let's recap the reaction test.

Whenever an initiative unit (IU) announces that it will take an action, any non-initiative unit (NIU) that has LOS to it may announce a reaction. Note that this is optional, as performing a reaction uses up any subsequent action the NIU may make. In most cases, though, you're going to want to react. If the NIU declares a reaction it may be one of two options - move or fire. However, a reaction test must be made to see who gets to perform first. Both sides roll a TQ dice and the side that passes (4 or more on the TQ die) gets to perform it's intended (re)action first. In the case that both die rolls succeed, the highest roll wins. In the case of draws, or both die failing, then the IU goes first. Let's look at an example:
The Germans are the IU and announce they will fire at the British. The British announce they want to move in reaction.
The British win the reaction test and move first.
The above illustrates a successful reaction test. If the Tommies failed the reaction test they would have to endure the fire before moving, so you better hope you win that dice roll!

So, that's pretty simple, eh? Well, remember that the reaction can be to fire at the IU instead. Any NIU in LOS can engage the IU in a round of fire as a reaction. The IU may decide to return fire. Every time a unit fires it loses 1 FP die for further actions or reactions that turn so sometimes you may want to take the hit and save the FP. Perhaps an example might help again:
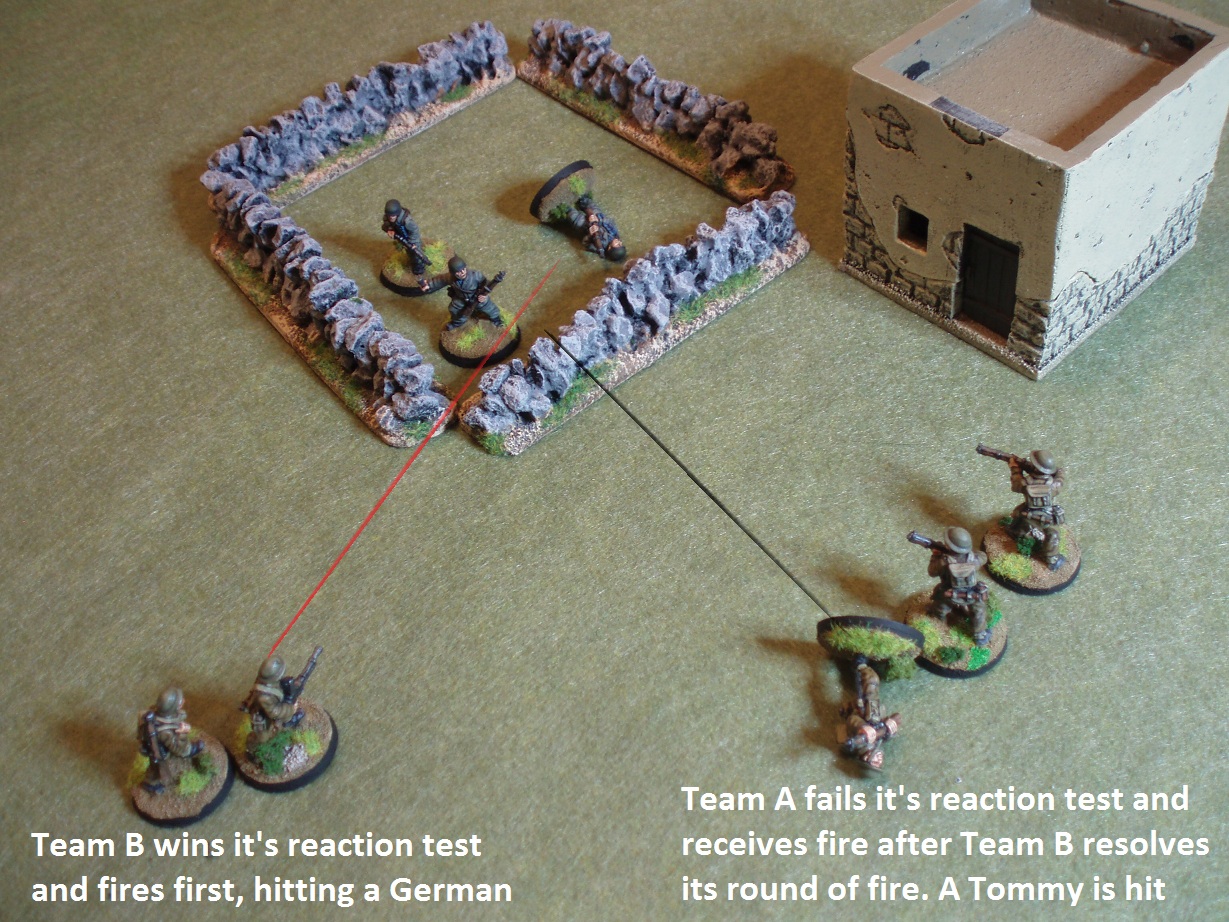
Same as above, but now we have a second British team with a Bren  (which we'll count as a SAW).
The Bren team hoses the Germans before they can shoot the other team, but a British trooper is still hit.
The British may now complete their move, but they have lost  a man.
EDIT - after browsing the rules, I realised I got the order of the above reactions the wrong way round. Team A that fails it's reaction should receive fire and move before Team B shoots. When there are multiple reactions you roll for all reaction tests first and then resolve all the NIUs that failed their test first. I've left the text in place for now, but I will reshoot the above sequence and replace as soon as I can.

Hmmm...! Still pretty simple if you ask me! To wind up, we'll look at the two features of modern rulesets that are notoriously hard to deal with - overwatch and opportunity fire. Opportunity fire is pretty simple; any IU that hasn't acted yet may sacrifice it's action to react to an enemy movement. So if the NIU successfully reacts with movement, then a second fire team may take an opportunity shot at them. Overwatch is slightly different. You place an IU on overwatch at the beginning of the turn and for the duration they may interrupt a reaction with fire. So an IU announces its action, a NIU announces it's reaction and then the overwatch unit announces it's interruption. The overwatch round of fire is treated normally and then the NIU may roll it's reaction test, if it can (i.e. it's not pinned or suppressed). One more example, methinks:


See? It's all pretty straightforward when you work it all out methodically. Of course, there are a lot of variations on the above situations with morale and suppression fire taking a big part. There are also situations where units can fall off overwathch. The examples I've given are the basics and there are even more differences when you deal with asymmetric warfare, as irregulars are limited in their reactions. The rules are very rich in content and deal with all sorts of stuff, so you'll just have to buy them to find it all out!

Again, I can't recommend Force on Force highly enough! The action/reaction mechanism coupled with the fantastic dice mechanism, results in a very fluid game that can be completed quickly and gives a believable result.

Fourth on Force

Tonight George and I played our fourth game of Force on Force and it was easily the best yet. Mostly because we now have a much firmer grasp on the rules. There was still a couple of occasions of flipping through the rules, but they were few and didn't disrupt the flow of the game too much. Instead, we got down to the serious business of rescuing a downed pilot from underneath the noses of the Taliban! Now, rather than just write an AAR, I thought I'd make this into a kind of review of the rules, too.

The Rule Book


Force on Force is published by Osprey in collaboration with Ambush Alley Games who designed the rules. I believe there were actually two volumes formerly produced by AAG and this version is actually the combination of them both. Unsurprisingly, the quality of the book is excellent with lovely plates of modern soldiers in full colour as well as photos of actual men in combat situations, which really beds you into the atmosphere and theme of the game. There is are also a few photos of miniatures to remind you that this is a wargames rule set! There are the usual chapters on movement and shooting, but there are also chapters on armoured combat, air support and artillery. Possibly of most interest, though, is the section on asymmetric warfare. So this is regular troops against irregular forces, such as the Taliban or Iraqi forces in the later stages of the second Gulf War. There is also a campaign section to take these rules a step further.

There is one criticism that I will lay at the feet of the publishers, which is it's poor layout. Some important rules are laid out in later sections after they have been mentioned, such as the action/reaction sequence. When you're reading through the rules it all makes perfect sense, but it can be quite frustrating trying to find something during play. Once you have the rules in your head, though, this is less of an issue and there is ample support in the form of the AAG forums. On the whole, this is really nice book and an attractive addition to any wargamer's bookshelf.

The Game


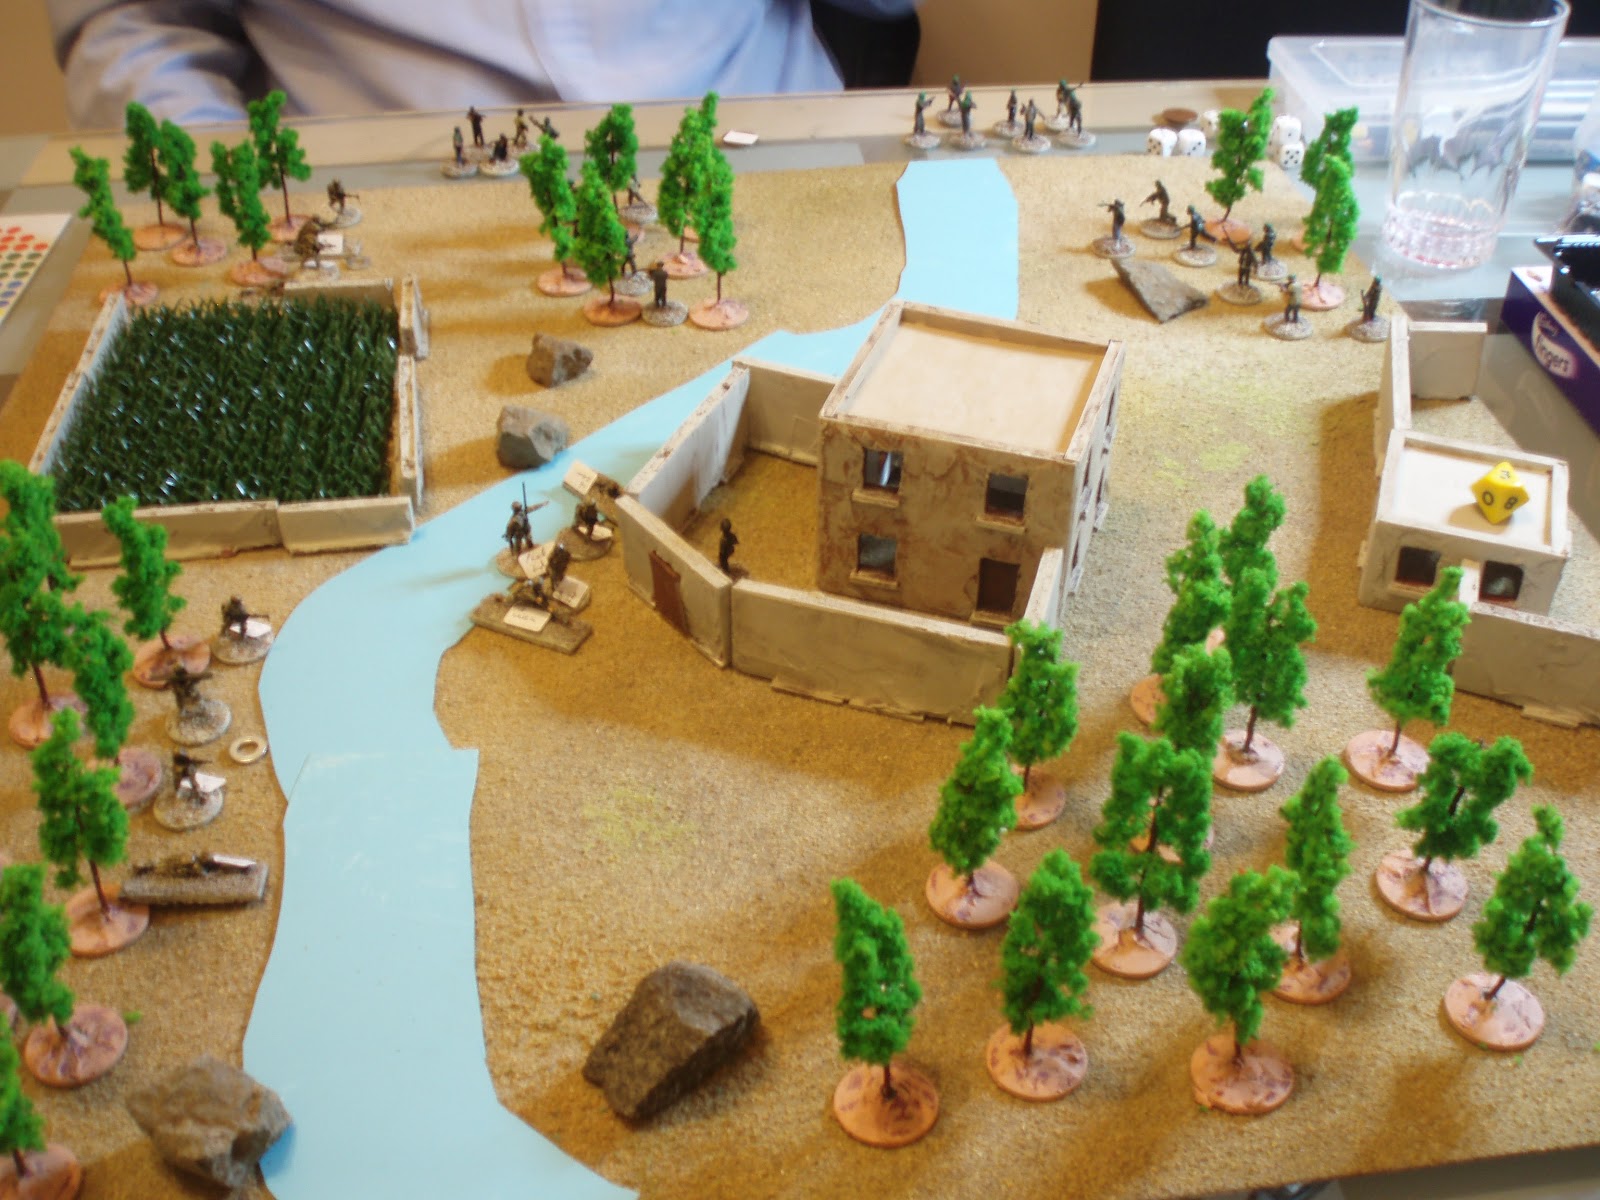
Now it's time to examine the rules in the context of our game. The situation is a downed pilot is hiding in the grounds of a house in Taliban territory and a British section has been dispatched to retrieve him. There is definitely enemy activity in the area so the Brits must be careful. Here's the setup - the Taliban forces are all hiding and so are not deployed on the table:
The battlefield. Perhaps taken by a UAV!

The scene from behind Fireteam Charlie looking towards the objective.
The player to move first in each turn is normally decided by a dice roll. Each player rolls a dice for every two of his units, plus a couple of modifiers, and the one with most successes (more about that later) wins the initiative. They then move each unit in turn with the opponent having the option to react to those actions. However, as the British are moving into the teeth of an ambush, the Taliban had the initiative by default on the first turn. They opted to stay hidden, though, leaving the British to start moving in. The second turn saw the Taliban again take the initiative and they decided to spring the first ambush on the British left...!

The Dice Mechanism


Each side is rated for it's initiative, quality and morale. The ratings are expressed in terms of a type of dice. Poor quality militia will have a Troop Quality (TQ) and Initiative of D6, while regulars are usually D8. In FoF there is a 'nearly universal' rule that whenever you roll a die, a result of 4 or more is a success. Let's examine that, as it's key to the game mechanics. You are always looking for a 4 or more, so the higher the quality of your men, the more likely you are to roll a success. So, in that second turn, how did the Taliban gain the initiative? They had four units, generating them 2 dice. They also had the initiative last turn which added another die. They also added another die for outnumbering the enemy. So they had 4. The British had 3 units, so they only got one die. So the Taliban rolled their 4D6 against the British 1D8. They rolled more successes than the British so retained the initiative.

The Trap is Sprung - How to React!

The Taliban appear out of nowhere in the treeline!
So, using the initiative, the Taliban deployed their first unit from hiding. They had to roll a single TQ die to see if they were successful and they were, so they fired first. Normally in FoF, whenever the side with initiative activates a unit, the other side can declare reactions by any unit with LOS to the acting unit. However, each unit then rolls an opposed TQ check, called a Reaction Test. Each side rolls 1 TQ die and the side that rolls a success wins. If both succeed, the highest roll wins. If both fail, the side with initiative wins. Aha! So here we have the integral dice mechanism again. If you're rolling a D8 against a D6 opponent, then you can win hands down with a roll of 7 or 8! Alas, due to scenario rules regarding ambushes, the Taliban got to fire first regardless.

Shoot Straight!

Each figure in the firing unit generates a Firepower (FP) die which are of the TQ type (i.e. TQ of D6 means your FP are also D6). Support weapons like SAWs and RPGs add extra FP. The defending unit then counts up the number of figures in the target unit and compares to the number of FP dice. He then takes the number of TQ dice equal to the lower of the two numbers. So, for example, in our ambush, the Taliban have six figures firing. One carries an RPG, so they have 7 D6. The British fireteam is only four strong, so they get 4D8. They have body armour and are in cover, so they get two extra dice for 6 total. They are rolled simultaneously :


Any failed rolls (3 or less) don't count. Then, the defender tries to negate any FP dice with defence dice of equal or higher value. So here's a picture of a British attack roll that happened later in the game with all the failures removed and the remaining D6 defence dice canceling out those D8s that they can:

Here comes the pain!
Here we see it again! The British rolled two 7s and an 8. The Taliban player is simply powerless to cancel those dice and the British are assured of 3 hits. Pretty easy and very intuitive! In this way, the better training and equipment of the regular forces really pays dividends! In our ambush situation, despite firing 7 dice, they managed to inflict no casualties.

The Story Unfolds!


We've had a brief look at the nuts and bolts of the game, so let's see how the battle unfolded. The British, having survived the first shots, now managed to seize the initiative (which they would hold for the rest of the game bar one turn). The flank fireteams fell into overwatch while the central fireteam crossed the stream heading for the objective.


The Taliban revealed a second unit on the British right, but using fire and maneouver the British forces pinned them and advanced the right flank to screen the central troops grabbing the pilot.


By now, more Taliban were coming out of the woodwork and a group made a beeline for the pilot's hidey hole to try and prevent his escape. However, the vigilant British on the right were alert to the danger and poured fire on them in reaction to their appearance. 


More enemy troops poured in through the woods and the British right soon found themselves under a lot of pressure. One soldier was hit, but luckily he was only lightly wounded and could carry on fighting. Their work was of great value, though, as the section leader signalled to the pilot to follow and they set off for the safety of their own lines.


Meanwhile, on the left a sharp exchange of fire saw the Taliban threat neutralised and the British surged in to capture the remnants.


As the Taliban casualties mounted through accurate fire from the British they were powerless to act as the pilot was safely escorted across the stream and into the safety of the woods beyond.


This was a very enjoyable game. The high quality of the British really turned the battle and on at least two occasions the Taliban rolled some very good dice, only to be thwarted by numerous 7s and 8s from the British. Force on Force is simply a very, very good game. The games are all scenario based and provide a strong narrative and very believable results. I really have only skimmed over the core of the rules, in particular the action/reaction sequence that has some very subtle nuances that are most satisfactory. If your interest has been piqued then I guess you'll have to buy the rules! I highly recommend anyone interested in skirmish games or modern warfare do so!

Friday, 9 March 2012

Blast from the past!


This is where it all began! I picked this up on eBay the other day purely for a blast of nostalgia, and what a blast it was! I remember every facet of the artwork on the cover. I remember pictures and diagrams inside. I even remember cutting out the counters at the back to play the sample scenario. But more than that...I remember all the games we played of this edition and 4th Edition back when WFB was actually a good game and not yet an arms race designed to empty my pockets. I recall with great fondness the large Orc & Goblin army, Empire army and Undead army I used to regularly play against my brother and my 2 friends, Paul and Andy, who had Chaos, Elves, Skaven and Dwarfs between them. Playing WAB recently also touched on these memories and those games have been fun because I've not had to learn new rules...the 'to hit' and 'to wound' tables in Warhammer are almost completely second nature!

So here's to WFB! It's what got me started on the tabletop side of things and you never know...! I might actually be tempted into painting up some greenskins again and bringing this old-old timer of a ruleset back to life!

Saturday, 25 February 2012

A Cattle Raid

Last Tuesday my freshly painted Viking army got their first outing on the table and it was a really fun, tense game. George had intended to bring his Saxons, but an incident involving his foot and a step meant that they now need to go in for some repairs! So instead he brought his Romano-British forces and used them instead. OK, a little anachronistic, but still very Dark Ages! The scenario we played was the Cattle Raid from the Age of Arthur book and the Vikings were aptly determined as the raiders. In this game, the Vikings have raided a village while the main body of the defenders are away, but they have returned just in time to intercept the Norsemen leaving with the livestock and some villagers for the slave trade! There are 3 groups of 'baggage' that the raiders have to escort off the table and winning or losing revolves mainly around that. So I placed my forces in front of the road with the Bondi on the flanks. I gave them thrusting spears with the idea that they should be able to hold the flanks while the Hirdmen did the dirty work. The Hird was in the centre with throwing spears and javelins with the aim of taking the fight to the enemy. The bow armed Bondi were out on my right, which turned out to be the wrong flank, as I wanted them to weaken the cavalry that was inevitably going to be present. However, George massed them all against my left! And so to the battle!

Unfortunately I only had the camera in my phone and the lighting at the club can be a little low at some of the tables, so apologies for the fuzziness of some of the pictures. 

After the first couple of turns the Vikings have surged forward  as befits their nature! The baggage is out of shot on the road to the left. The Romano-British knights have thrown themselves against the Bondi on my left. The Hird over there (with the king) have started to turn to get them in the flank.

The Romano-British skirmishers in the centre have been driven back and the Hird are getting excited about chopping up the Welsh allies in the centre (white shields). The other enemy have formed a shield wall behind their skirmishers while the Viking bowmen have come up to disperse them.

The knights crash into the unfortunate Bondi. Despite the thrusting spears and rankss, this unit just could not cope with the better quality knights and the two characters in their midst.

The Viking King eyes up the Welsh cavalry beyond, waiting to see the outcome of the knights' charge and whether  he needs to lead his Hird against them or block the approach of the farther away horsemen.
After two vicious rounds of combat the Bondi break and flee, but are cut down to a man. The victorious knights descend upon the captured baggage and free one group. They are too late to save the farthest group, so it's one apiece! Who will secure the last group to the right of the picture?
The knights barely have time to cut the bonds of the women and children and turn their mounts before the Viking king brings his Hirdmen around and charges towards them! The decisive moment of the battle approaches! 
Meanwhile, in the centre the Welsh allies fled before the ferocious charge of the Hird and they did  not stop until safety was reached in the hills far from the battle. On the right, the skirmishers continued to exchange arrows. Eventually the Viking numbers would tell and the Romano-British archers would run, leaving the shield wall to also get whittled away to nothing.

Having seen off the Welsh foot, the Hird move around to pin the Welsh light horse on their ponies. It is imperative that their King be left to deal with the enemy king without interruption! Over the last turns the Hird would charge time and again, but the Welsh would flee from them, just to return thanks to their leaders skilled direction. However, eventually the fight would be forced and the fighting ability of the professional Vikings would tell.
On the left the battle is decided! In a furious charge the Viking King  led his Hird against the knights and he singled out the one known as Arthur. In a single blow he felled the Romano-British general and all about him his fellow warriors cleaved and hewed at their enemies. The knights morale broke at the sight of their fallen hero and they turned and fled. The remaining baggage was firmly in the hands of the raiders!
This was a really fun game. It was very fluid and full of movement, rather than just two battle lines clashing. I think if George had been more aggressive with his Welsh horse he could have caught the last baggage group and won the battle, but as it was he let me pull him into a fight he couldn't really win. But we both really enjoyed it and that's what matters the most. And it just proved again that WAB really shines in Dark Ages battles with the heroes meeting up to the expectations of the Sagas and poems!


Saturday, 11 February 2012

Would the real Yorktown please stand up!


Well, after visiting Jamieson's Models it seems that Yorktown is, in fact, harder to find than hens teeth! So, I picked up a model of Hornet instead. Not perfect, but who cares, really? It's a big Yankee carrier to sit on a wargames table. I will probably paint it up in the colours of Yorktown for the game and then repaint as the Hornet if it's good enough to put on display. I must confess, though, I'm really enjoying building the model. Brings back lots of memories of building kits as a kid. I recall my ceiling was almost completely hidden behind a veritable armada of model planes hanging from it!

Friday, 3 February 2012

Countdown to Midway


Akagi, Kaga, Soryu and Hiryu! For me, these are some of the most evocative names from the Second World War. They roll off the tongue with a kind of mysterious beauty; the distillation of raw Japanese aggression - the Samurai spirit. As a youth I recall watching the film Midway again and again, enthralled by the drama that unfolded before me each time. This was a battle full of mistakes, luck, bravery and myth and for those reasons it has always stayed a favourite, much like Rorke's Drift and Waterloo (due in no small part to their respective films, too!).

On the first Tuesday of every month my club puts on large multiplayer game that is open to anyone that turns up and in 2010 I ran a series of five Check Your 6! Battle of Britain games to commemorate the 70th anniversary. These were pretty successful and one of those nights holds the joint record for participants at a whopping 17 players. Since it has been more than a year since I organised a First Tuesday Game (or FTG as they are known), I was thinking about putting a one-off CY6! game together and the decision was instantly made when I realised that June would see the 70th anniversary of Midway. I also thought it might make an interesting series of posts to follow the assembly of the forces and the scenario design leading up to the game and an AAR once the dust settles.

So, let's start with the battle itself and some reading suggestions. I'm not going to go into detail as most people will probably be familiar already, but for those few that aren't, the Battle of Midway was fought on June 4th in the Central Pacific between the First Mobile Strike Force (Kido Butai) of the Imperial Japanese Navy (IJN) under Vice Admiral Nagumo Chuichi and two American carrier task forces under Admirals Frank J Fletcher and Raymond A Spruance. The Japanese committed all four fleet carriers available after the Coral Sea debacle against three American carriers and the aircraft available on the Midway atoll itself. The end result of the ensuing chaos was the loss of all four Japanese flight decks to just one American, the USS Yorktown. If you would like more information on the forces involved and the events that unfolded then you could check the Wikipedia entry and the BBC websites, although both are understandable quite thin on detail and, in fact, a bit wrong in some places. For a more detailed overview, then you can't go far wrong with the Osprey Campaign volume on Midway. However, by far the best book I've ever read on the subject is Shattered Sword, by Jonathan Parshall and Anthony Tully. This book goes into great detail and focuses primarily on the Japanese side of things, which is really the most interesting, as it was they who made all the mistakes and suffered from a real malaise in their operational and strategic planning. It also goes to great pains to dispel the 'overwhelming odds' and other myths associated with the battle.

As for the game, my first issue was exactly what to try and recreate in a single game. Clearly the number of ships and planes involved and the distances covered are not in the scope of a single game of CY6!, so I had to figure out what slice of the battle is appropriate. My initial, gut reaction was to game the final American attack on Hiryu, but the problem with that is that only the American SBD-3 Dauntless dive bombers attacked the ship and I think that this provides a limited amount of tactical scope to the players. All we end up with is a simple 'stop the bombers' scenario, with the Zeros trying to shoot down the bombers while avoiding the US Wildcats. What I think will work better is to have an attack by both high level dive bombers and low level torpedo bombers, so that the players need to consider splitting their forces and losing height to defend against the ultimately more deadly torpedoes. Well...that's where we fall flat on our face with American naval aviation at Midway. Of the 50 odd TBD Devastators that attacked the Japanese carrier group, almost all were shot down and not a single torpedo struck any ship, never mind a carrier!

So I think we need to turn our attention to the Yorktown. The Hiryu's counterstrike against the Americans isn't really perfect, either, as there was about an hour or so between the first dive-bomber attacks and the follow-up torpedo bomber attacks, but I think that I think having the two waves in the one game, one slightly later than the other, will be acceptable. I also think that this will make a slightly better scenario for the simple fact that the Japanese Type 91 torpedo was an excellent weapon and poses a much more deadly threat than it's American counterpart. In all honesty, if we were to do the American attacks on the Japanese carriers then I'd be compelled to impose such severe penalties on the torpedo attacks that the Japanese players would probably leave the Devastators to it! However, on the day, Yorktown was struck by two Japanese torpedoes which was the crippling blow to her, so gaming this attack makes more sense. Also, Yorktown was the only carrier that wasn't out-and-out destroyed on the 4th of June. In fact, she was being escorted back to Pearl Harbor a couple of days later, with hopes of repairing her, when she was struck by torpedoes from a Japanese submarine which finished her off. So, the damage to Yorktown had little effect on the battle as the Japanese fate was already sealed, so it seems a bit more fitting to see if the American players can save this tough old warhorse! The only downside is that I don't get to paint up any Dauntlesses, which is one of my all time favourite WWII aircraft!

The next step is to gather the models necessary and paint them up. Rather than going for the usual 1/300 planes I will use 1/600 models instead, as there are a few options for 1/700 models of the Yorktown. At that size, the difference in scale should be negligible and looking at smaller models on a big flat, blue surface should lend a slightly more panoramic feel to the game. Hopefully I should get my hands on a suitable model from the nice folk at Jamieson's Models in Glasgow and I will post some pics when I do and my progress in building it.

That's all for now! :)
Related Posts Plugin for WordPress, Blogger...